
“I want to use warm Japanese paper for handmade invitations and restaurant menus.” “I want to print my own artwork on Japanese paper to create a special piece.”
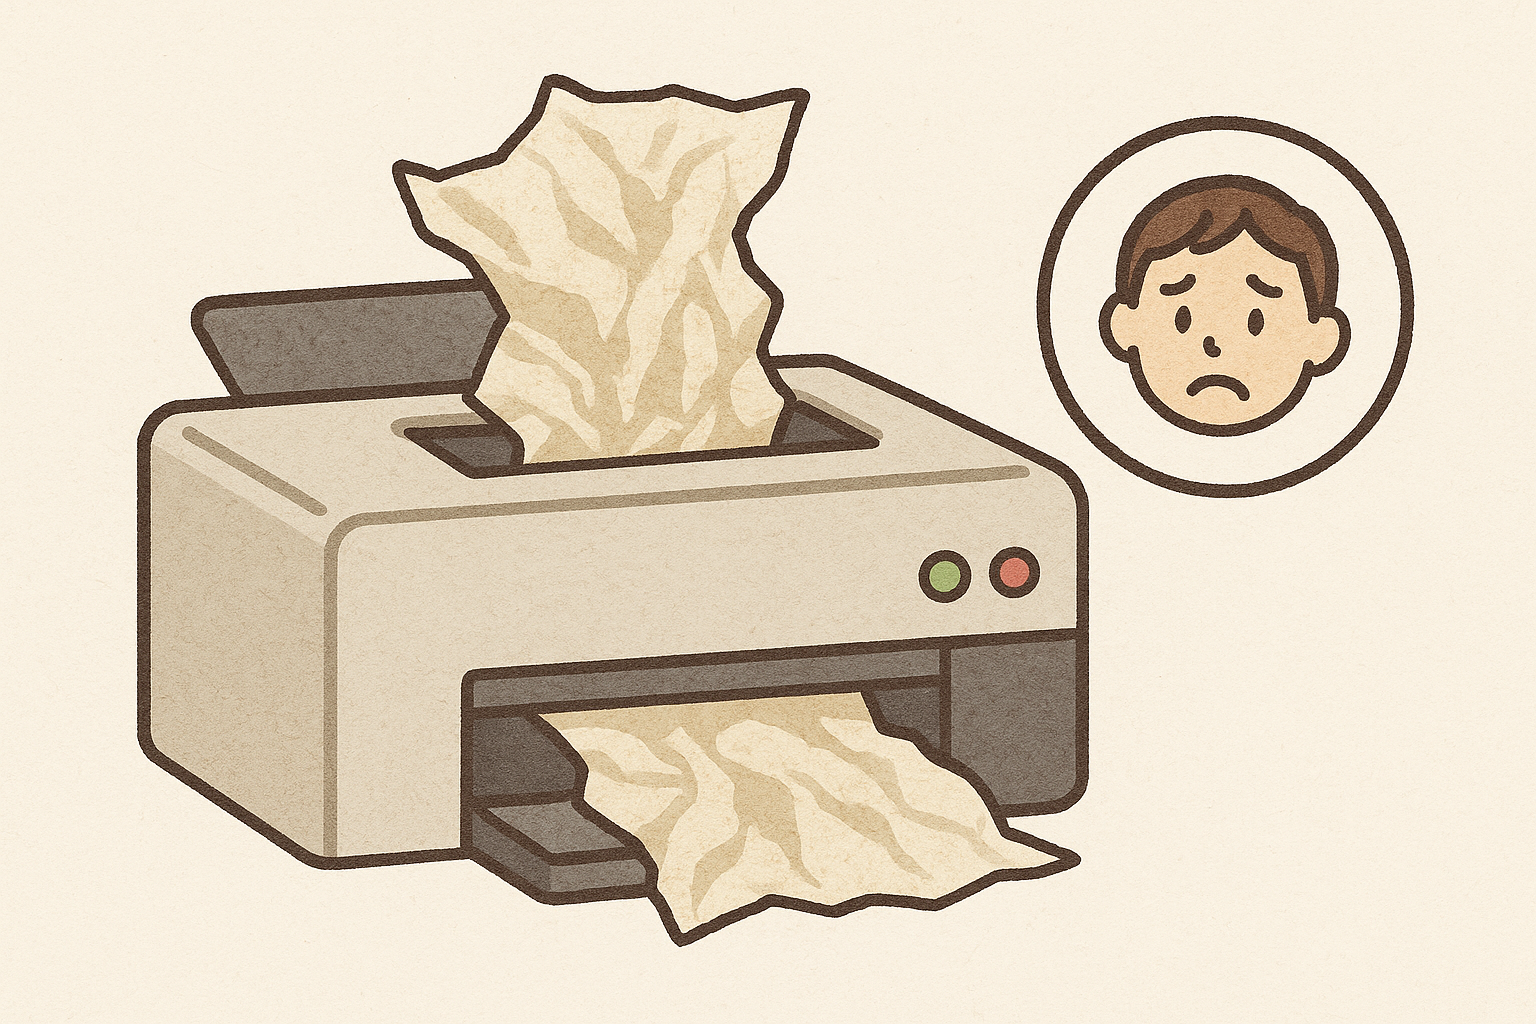
Have you ever tried printing on Japanese paper with your home printer, only to experience issues like “the ink bleeds and the text is unreadable,” or “I’m afraid the paper jam will break the printer”?
This article is written for beginners who want to try printing on Japanese paper with their home printers.
By reading this article, you will learn everything from how to choose Japanese paper compatible with your printer, to specific settings to prevent bleeding and paper jams, and countermeasures for common failures.
By the time you finish reading, you will be able to enjoy beautiful Japanese paper printing with your home printer, just like a professional.
Basic Points to Avoid Failure When Printing on Japanese Paper with a Printer
First, let’s start with the basics.
We will explain in an easy-to-understand way why ordinary Japanese paper fails and the minimum points you should know before starting to print on Japanese paper.
Just by understanding these points, you can significantly reduce the probability of failure.
Three Prerequisites for Beginners in Printing on Japanese Paper with a Printer
To succeed in printing on Japanese paper, it is important to first know three basic prerequisites.
- Not all Japanese paper is compatible with printers.
- There are two types of printers, inkjet and laser, and each is suitable for different types of Japanese paper.
- If you do not use the correct paper settings, you are highly likely to fail.
If you ignore these three points and print on ordinary Japanese paper, it can cause problems such as ink bleeding and paper jams.
First, let’s firmly grasp the basics: “choose Japanese paper specifically for printers and use the correct settings“.
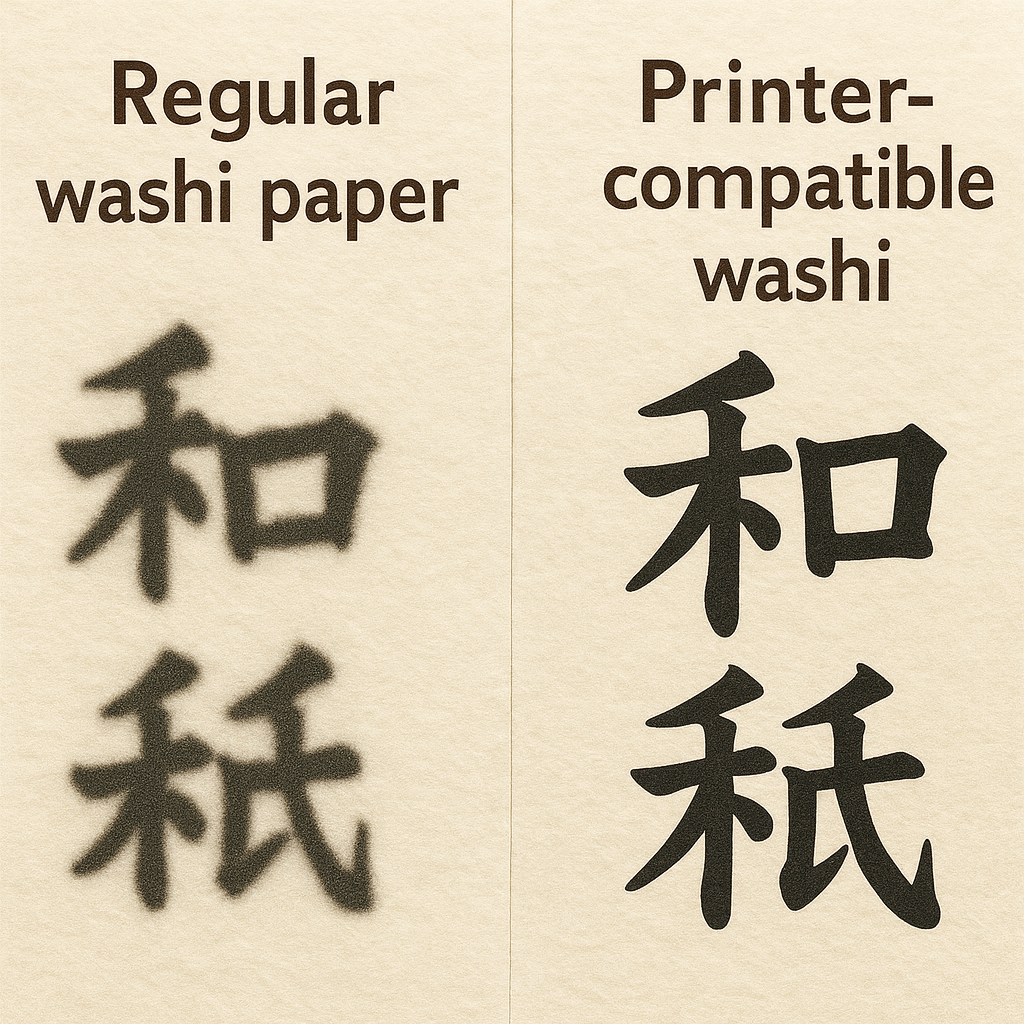
Characteristics of Japanese Paper (Bleeding, Texture, Thickness) and Differences from Printer Paper
Japanese paper has a unique texture and warmth because it is made of long, intertwined fibers.
However, the gaps between these fibers absorb too much ink, making it more prone to bleeding compared to plain copy paper.
Also, handmade Japanese paper, for example, may have an uneven thickness or a textured surface, which can easily cause paper jams when fed through a printer as is.
On the other hand, copy paper for printers has a smooth surface and is processed to fix the ink beautifully.
Understanding this difference is the first step to avoiding failure.
“Compatible Paper” and “Ink to Use” to Master Japanese Paper Printing with a Printer
To avoid failure, it is most important to choose Japanese paper labeled as “printer compatible.”
These Japanese papers are coated to suppress ink bleeding, and the paper’s thickness and stiffness are adjusted for easy feeding through a printer.
Also, there are two types of printer inks, “dye ink” and “pigment ink,” and they have different compatibilities.
Generally, if you want to print clearly while suppressing bleeding, “pigment ink,” which easily fixes to the paper surface, is said to be suitable for printing on Japanese paper.
How to Check if Your Home Printer is Suitable for Japanese Paper Printing
There is an easy way to check if your printer is suitable for printing on Japanese paper.
First, check the paper feeding method of your printer.
Models with “rear feed” or a “manual feed tray,” which feed the paper straight through without bending it, are more advantageous for handling thick Japanese paper than “front feed,” which bends the paper into a U-shape.
Next, check the types of “compatible paper” in your printer’s instruction manual or on its official website.
If your printer supports various thicknesses of paper, such as “heavyweight paper” or “postcards,” it can be said that it is easy to try printing on Japanese paper.

How to Choose Japanese Paper Compatible with Your Printer
The key to avoiding failure lies in “choosing the right Japanese paper.”
The optimal Japanese paper varies not only depending on its compatibility with your printer but also on what you want to create.
Here, we will introduce specific points on how to choose the one that suits your printer and purpose.
Types of Japanese Paper, such as for Inkjet and Laser, and How to Distinguish Them
There are mainly two types of printer-compatible Japanese paper: “for inkjet printers” and “for laser printers.”
Inkjet paper is processed to optimize ink absorption, while laser paper is heat-resistant to fix the toner with heat.
It is important to be careful, as using the wrong type can not only result in poor printing quality but also lead to printer malfunction.
The product package will always have a description such as “for inkjet only” or “laser printer compatible,” so be sure to check your printer type before purchasing.

Standards for Thickness and Size of Japanese Paper Easy to Use with a Printer
For beginners, we recommend Japanese paper that is slightly thicker than general copy paper (about 0.09mm), around 0.12mm to 0.15mm.
It has moderate thickness and stiffness, making it easy to handle with a printer.
As for the size, let’s start by trying A4 size.
A4 is the most standard size, so printer settings are simple and it is also ideal for test printing.
The beginner set we sell at our store is also centered around this A4 size, so please take a look.
Recommended Japanese Paper by Use (Thank-you notes, Goshuin, Menus, Invitations)
The recommended Japanese paper varies depending on what you are making.
- Thank-you notes and invitations:
- Slightly thick, white “Taireishi” paper, which gives an elegant impression, is popular. The pattern of scattered fibers creates a sense of luxury.
- Goshuin (temple/shrine stamps):
- Thick “Hoshogami” paper, which has little ink bleeding and is resistant to show-through, is a standard choice.

- Restaurant menus:
- Since it will be touched frequently, Japanese paper with a certain thickness and durability is recommended. Choosing a slightly cream-colored Japanese paper will give photos of food a warm impression.

Checkpoints on product pages to avoid failure when shopping online
How to read descriptions like “Printer compatible” and “For inkjet”
When choosing Japanese paper on an online store, carefully check the product name and description.
Keywords such as “Printer compatible” and “Inkjet washi paper” are essential.
Furthermore, if it says “Compatible with both pigment and dye,” you can use it with most home inkjet printers with peace of mind.
“Thickness” and “basis weight (g/m²)” are also important indicators. The higher the basis weight, the thicker the paper.
General copy paper is about 64g/m², so choose based on this.
Keywords to check in reviews and points to note
Reviews from people who have actually purchased the product are very helpful.
In particular, try searching within the reviews for keywords such as “paper jam,” “bleeding,” and “color development.”
You may find useful information, such as specific success stories like “I was able to print without problems with the (printer model name)” or “It was smooth with manual feeding.”
However, since many comments are based on individual environments, it is important to refer to multiple reviews and make a comprehensive judgment.
Optimal Combination of Printer Settings and Ink for Japanese Paper Printing
Even if you choose good Japanese paper, it will be ruined if the printer settings are incorrect.
Here, we will explain important techniques to achieve a beautiful finish, from the way of thinking according to the type of ink you use to specific setting methods to prevent bleeding and blurring.
A gentle explanation of the compatibility of pigment ink, dye ink, and Japanese paper
There are roughly two types of ink for inkjet printers: “pigment ink” and “dye ink.”
- Pigment ink: The color particles are large, and the ink fixes to the surface of the paper. Therefore, it is less likely to bleed and is suitable for printing text and other things clearly. For printing on Japanese paper, pigment ink is generally recommended.
- Dye ink: The color particles are fine, and the ink soaks into the paper fibers to produce color. It creates a vivid and transparent finish, but it tends to bleed due to the nature of Japanese paper.
Check which ink your printer uses and use it as a reference when choosing Japanese paper.
Recommended paper settings for each printer for Japanese paper printing (plain paper, heavyweight paper, postcard)
When printing on Japanese paper, be sure to change the “paper setting” in the printer driver.
If you leave the setting as “plain paper,” the amount of ink ejected will be too much, causing bleeding, or the paper may not feed properly.
First, try setting it to “heavyweight paper” or “postcard.”
Depending on the manufacturer, selecting a setting such as “inkjet postcard” or “photo matte paper” may optimize the amount of ink and allow for beautiful printing.
We recommend test printing a few sheets to find the setting that produces the most beautiful finish.

Print quality settings to reduce bleeding and blurring (draft/standard/fine)
In addition to the paper setting, also adjust the “print quality.”
Many printers have options such as “fast (draft),” “standard,” and “fine (high quality).”
It may seem surprising, but the “fine” setting ejects a lot of ink, which can actually worsen bleeding.
It is important to control the amount of ink, for example, by first trying “standard” and if it bleeds, switching to the “fast” setting.
Conversely, if blurring occurs, it may be because there is not enough ink, so try the “fine” setting.
Tips for color and color development to be aware of in color printing and photo printing
Example settings for making text look sharp in monochrome printing
For thank-you notes and invitations where the text is the main focus, sharpness is required.
In this case, it is ideal to use “pigment black” ink.
In the printer settings, check “grayscale printing” and set the paper setting to “heavyweight paper” or similar. The print quality should be “standard” as a base, but if the text is blurry, perform a head cleaning or set the quality to “fine.”
If you are concerned about bleeding, choosing an inkjet washi paper with a coated surface that is compatible with pigment ink is effective.
Simple steps to adjust photos and illustrations for Japanese paper
Since Japanese paper easily absorbs ink, photos and illustrations tend to look a little dull and dark after printing compared to how they look on a computer screen.
To prevent this, the trick is to make a small adjustment with image editing software before printing.
Specifically, try slightly increasing the “brightness (luminance)” and “contrast” of the image.
As a guideline, simply increasing each by about 5-10% will make the impression of the printed result much brighter.
If you overdo it, the whites will be blown out, so we recommend adjusting while checking the finish on a test sheet first.
Common Mistakes Made by Beginners in Printing on Japanese Paper and Their Countermeasures
It’s a path everyone goes down at least once.
Here, we will explain in an easy-to-understand way the typical mistakes that beginners tend to make, their causes, and specific countermeasures.
Even if you think, “Ah, I’ve done that before…”, you can rest assured after reading this.
Causes and Solutions for When Text is Illegible Due to Excessive Bleeding
The most common failure in printing on Japanese paper is “ink bleeding.”
This is caused by the high water absorption of Japanese paper, which causes the ink to soak into the fibers more than necessary.
There are three solutions.
- First, use “printer-compatible Japanese paper” with a surface processed for inkjet.
- Next, change the paper setting on the printer to “heavyweight paper” or similar to adjust the amount of ink ejected.
- Finally, try lowering the print quality from “fine” to “standard.”
High-quality settings use a lot of ink, which can actually cause bleeding.
Points to Review When Paper Jams or Feeding Errors Occur
“Paper jams” are a major problem that can lead to anxiety about printer failure.
In many cases, the cause is that the Japanese paper is too thin, too thick, or has warped due to humidity.
As a countermeasure, first use the printer’s “rear feed” or “manual feed tray.”
This allows the paper to be fed without being bent significantly, making it easier to transport smoothly.
Also, it is important not to load a lot of Japanese paper at once, but to load it carefully one sheet at a time, or a few sheets at a time.
Get into the habit of checking for warping or creasing in the Japanese paper before printing.
How to Prevent Mistakes of Printing on the Wrong Side or in the Wrong Direction
Printer-compatible Japanese paper has a “printing side (front)” that is processed so that the ink sits nicely, and a “back side” that is not.
If you get this wrong, it can lead to bleeding and poor color development.
In many cases, there is an explanation on the package, or the smoother side to the touch is the printing side.
If you don’t know which is which, first make a small mark with a pencil on a plain sheet of copy paper and test which side it prints on and which side comes out on top.
This extra step is the trick to not wasting precious Japanese paper.
Where to Check When Ink Stains or Smudges Appear
Unintended ink stains or linear smudges may appear on your prints.
This is mainly caused by the ink coming into contact with the printer’s internal rollers or other parts before it is completely dry.
This is especially likely to occur after printing photos or illustrations that use a lot of ink.
As a countermeasure, first turn on items such as “smudge reduction” or “increase drying time” in the print settings if they are available.
Also, periodically performing a “roller cleaning” using the printer’s utility function can remove internal dirt and improve the situation.
Procedure to minimize failure risk with test printing
Don’t print on the final Japanese paper right away. It’s a golden rule to always do one test print.
Print with the same data and the same settings as the final print, and check for “text bleeding,” “color reproducibility,” and “print position misalignment.”
If possible, it’s also a good idea to cut a small piece of the final Japanese paper and print on just a part of it.
By identifying problems with this test print and making minor adjustments to the settings, you can dramatically reduce failures in the final print. Haste makes waste.
“This is a no-go”: 5 actions to avoid in Japanese paper printing
- Using “non-printer compatible” Japanese paper: Casually using Japanese paper you received as a souvenir can cause malfunctions.
- Leaving the paper setting as “plain paper”: The ink will almost certainly bleed.
- Loading a large amount in the paper feed tray: This is the biggest cause of paper jams.
- Touching it with your hands immediately after printing: Wait until the ink is completely dry.
- Using warped or damp Japanese paper as is: This can lead to paper feed errors and stains.
Recommended Usage Scenarios to Make Your Japanese Paper Printing Shine with a Printer
Once you’ve mastered the basics, it’s time to put it into practice.
Once you can print on Japanese paper, you can create many wonderful items depending on your ideas.
Here, we will introduce recommended usage scenarios along with specific tips that will expand your creative desire.
Tips for handwriting invitations and seating charts with a Japanese paper printing printer
Using Japanese paper for wedding invitations and seating charts instantly adds a special touch and warmth.
“Taireishi” paper, which has shiny fibers mixed in, is particularly popular.
The trick is not to cram in too much design, but to leave plenty of white space to take advantage of the texture of the Japanese paper. Choosing a Mincho or brush script font will give the overall atmosphere a much more cohesive look.
By printing at home, you can create original paper items filled with your heart while keeping costs down.
Advantages of printing restaurant menus and shop cards on Japanese paper
Using Japanese paper for menus and shop cards in Japanese restaurants, cafes, and general stores can express the store’s commitment and worldview.
The texture and luxurious appearance that plain paper does not have gives customers the impression that “Oh, this store is different.”
In particular, simply printing seasonal recommended menus on Japanese paper and inserting them can create a special feeling.
Printing ideas to enhance the world of Japan, such as Goshuin and shrine/temple information
Japanese paper printing is also ideal for Goshuin (temple/shrine stamps) given at temples and shrines, and for information signs on the grounds.
We recommend inkjet Japanese paper of the “Hoshogami” type, which has little bleeding and beautifully reproduces the color of the ink.
By using a printer, you can easily create as many copies as you need of pre-written Goshuin and announcements for seasonal events.
The solemn and pure atmosphere of Japanese paper will further enhance the worldview of temples and shrines.
How to use postcards and art prints to increase the value of your work
It is also highly recommended for illustrators and photographers to print their own works on Japanese paper.
The unique texture and soft feel of Japanese paper give depth and dimension to the work, enhancing its value as a “work of art” rather than just a “printed matter.”
In particular, illustrations with a watercolor or ink painting touch, and landscape photographs are exceptionally compatible with Japanese paper.
You can create a one-of-a-kind piece for sale at a solo exhibition or as a special gift for someone.
The difference in impression between “plain paper” and “Japanese paper” as seen in before and after comparisons
Even if you print the same design, the impression will change completely just by using different paper.
For example, let’s consider a thank-you note.
With plain paper (copy paper), it tends to give a businesslike and impersonal impression.
However, simply by printing the same content on Japanese paper, the good texture and warm appearance convey a deeper and more polite feeling of gratitude.
This “difference in impression” can be said to be the biggest advantage of choosing Japanese paper.
How to look good even for design beginners by using templates
It’s okay even if you think, “I can’t do design.”
Nowadays, there are many stylish free templates on the internet that can be used for invitations, menus, and postcards.
Many of them can be edited with Word or PowerPoint, so you don’t need any specialized software.
By searching for things like “menu template Japanese style free,” downloading a design you like, and changing the text, even beginners can create printed materials that look like they were made by a professional.
Printer-Friendly Paper Specs and Safety Check
To enjoy printing on Japanese paper, don’t forget to take care of your precious printer.
Here, we will explain how to choose Japanese paper that is less burdensome on the printer, how to feed paper to prevent trouble, and points to make your printer last longer.
Guidelines for Thickness, Stiffness, and Size of Japanese Paper to Avoid Damaging the Printer
When considering the burden on the printer, you should choose Japanese paper carefully.
As a guideline for thickness, a basis weight of about 70g/m² to 120g/m² is a relatively easy range to handle.
This is an image of being slightly thicker than general copy paper (about 64g/m²) and thinner than a government-issued postcard (about 209g/m²).
If it is too thin, it is likely to get caught in the paper feed roller, and if it is too thick, it will not be able to be transported and will get jammed.
It is also important that it has a moderate “stiffness,” and you should avoid flimsy Japanese paper.
Importance of Choosing Japanese Paper with Reduced Paper Dust and Curl (Warp)
If there is a lot of fine fiber debris, so-called “paper dust,” coming from the surface of Japanese paper, it can adhere to the printer’s internal rollers and sensors, causing malfunctions.
Also, Japanese paper that has been stored poorly and has curled (warped) due to absorbing moisture will also cause paper jams and printing smudges.
“Printer-compatible Japanese paper,” which is made with the assumption of being used in a printer, is adjusted to prevent such paper dust and curling, so you can use it with peace of mind.
Compatibility of Paper Feeding Methods such as Manual Feed Tray and Rear Feed with Japanese Paper
Let’s re-examine the paper feeding method of your printer.
“Front feed,” which is adopted by many printers and feeds paper from the tray at the bottom of the main unit, puts a strain on thick paper and paper with strong stiffness because it reverses the paper 180 degrees inside.
On the other hand, “rear feed” or a “manual feed tray,” which feeds paper straight from the back of the printer, is ideal for printing on Japanese paper because it puts less strain on the paper.
If you are considering purchasing a printer from now on, we strongly recommend choosing a model that can do this “rear feeding.” The possibilities of Japanese paper printing will greatly expand.
Daily Maintenance to Make Your Printer Last Longer
To enjoy printing on Japanese paper for a long time, printer maintenance is also important.
In particular, since paper dust tends to accumulate inside, periodically run a “roller cleaning” using the printer’s utility software.
Also, if you don’t print for a long time, the ink can solidify in the nozzles.
We recommend printing a nozzle check pattern at least once a month to keep your printer in good condition.
“Japanese Paper Condition Check” You Can Do Before Printing
Get into the habit of checking the condition of the Japanese paper you will use with your fingers before pressing the print button.
First, hold the four corners of the Japanese paper to check for major warping.
If it is warped, gently bend it in the opposite direction by running it over the edge of a desk to make it flatter.
Next, if you are printing multiple sheets, fan the paper to check that they are not stuck together by static electricity.
This simple check can significantly reduce paper feed errors.
Simple cleaning and storage methods to do after printing
After you have finished printing on Japanese paper, if your printer has a cleaning function for the “output tray,” running it will help prevent the accumulation of paper dust.
Also, the storage method for leftover Japanese paper is important.
Humidity and dryness are major enemies, so return it to the bag it came in at the time of purchase and seal it tightly.
Then, store it in a flat place where it will not be exposed to direct sunlight and where there are few temperature changes.
The next time you use it, you can start printing in the best condition.
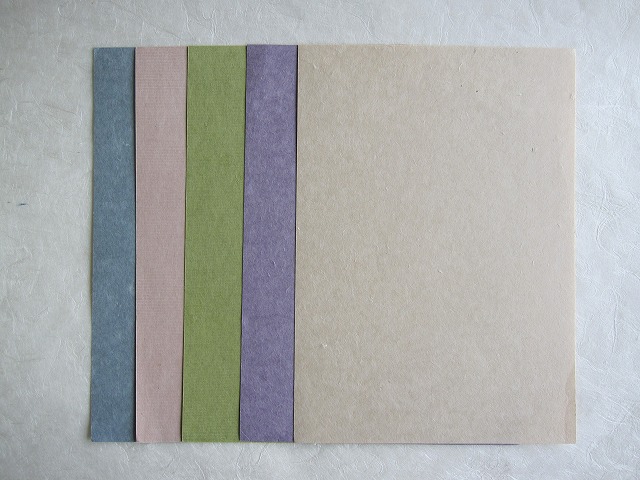
Comparison of Printer-Compatible Japanese Paper and a Diagnosis to Find the Type That Suits You
Even if you say “printer-compatible Japanese paper,” there are various types.
Here, we will introduce a simple diagnosis to find the perfect one for your purpose and preference from the many options, as well as the characteristics of different types of Japanese paper.
Texture-focused? Color-focused? Characteristics by type of printer paper
Printer-compatible Japanese paper can be broadly divided into two types.
- Texture-focused type: For those who want to cherish the original fiber feel and texture of Japanese paper. It may bleed a little, but it will have a warm finish. Recommended for thank-you notes and art prints.
- Color-focused type: For those who want to make photos and illustrations look vivid. The surface coating is strong and accepts the ink well, so the colors are less likely to look dull. Suitable for menus and postcards.
We offer handmade Japanese paper that emphasizes texture at our store.
The criteria for choosing Japanese paper changes depending on whether you “use it for work” or “enjoy it as a hobby”
The criteria for choosing Japanese paper also changes depending on the application.
- For work use (menus, invitations, etc.): Stable quality and a certain degree of durability are required. It is a good idea to choose a product with a stable lot that can be printed the same way every time, or a slightly thicker Japanese paper.
- For hobby use (art, letters, etc.): It is recommended to view failures as part of the fun and to try various textures and thicknesses of Japanese paper. Handmade-style Japanese paper with different textures for each piece can also be a trigger for creating interesting works.
How to determine the right Japanese paper for you with samples and trial sets
It takes courage to buy a pack of 100 sheets right away, doesn’t it?
In such cases, let’s use “samples” or “trial sets” that contain several sheets of different types of Japanese paper.
You can actually print with your own printer and directly compare the texture, ink adhesion, and color development.
Our most popular “Japanese printer paper trial set” allows you to try 5 different types of Japanese paper, so you’re sure to find your favorite one.
Checklist to find out! The type of Japanese paper recommended for you
Characteristics of people for whom a sturdy, thick type is suitable
- I want to make things that many people will touch, such as restaurant menus and shop cards.
- I want to create a sense of luxury and profoundness.
- I want a presence that doesn’t feel flimsy for art prints.
- The printer has a “rear feed” or “manual feed tray.”
Characteristics of people for whom a thin, light type is suitable
- I want to make things that are not bulky, such as stationery, notepads, and book endpapers.
- I want to create a delicate expression that is translucent to light.
- I want to keep the overall weight down because I will be sending it in an envelope.
- The printer only has front feed, and I am worried about feeding thick paper.
Tips to Get Your Finish to a Professional Level
Once you’ve mastered the basics, it’s time for the advanced section.
We’ll introduce techniques to elevate the finish of your Japanese paper prints to a professional level with just a few small tweaks, such as layout, font selection, and minor image adjustments.
Transforming it into a “luxurious printed matter” with layout and white space design
The secret to a professional-looking finish is in the “white space“.
If you cram text and photos to fill the entire screen, it will inevitably look amateurish and cramped.
By leaving ample white space on the top, bottom, left, and right, the eye is naturally drawn to the center, creating a sophisticated and luxurious feel.
This “empty space” is especially important to bring out the texture of Japanese paper. Before you start designing, let’s first think about “how to create white space.”
How to enhance the atmosphere of Japanese paper with font selection
The font (typeface) is an important element that determines the impression of the printed matter.
Fonts that bring out the beauty of the Japanese language are a good match for Japanese paper.
If you want a refined and polite impression, “Mincho” is recommended, and if you want a powerful and impactful impression, “brush script” or “semi-cursive script” is recommended.
Conversely, be aware that overly pop Gothic or rounded fonts may not match the atmosphere of Japanese paper.
Simply choosing a font that matches the content you want to convey will dramatically improve the finish.
Tips for image adjustment to match photos and illustrations with the texture of Japanese paper
When printing photos and illustrations on Japanese paper, a little touch-up to the image will make it blend in better with the texture of the Japanese paper.
Try slightly lowering the “saturation” of the image using the functions of an image editing software.
By slightly dulling the colors, it will harmonize with the natural base color of the Japanese paper, creating a moist and calm impression.
Processing it in “sepia tone” or “monochrome” is also one of the techniques that enhances the nostalgic atmosphere of Japanese paper.
“Drying time” and “storage method” that make a difference with a little effort
Immediately after printing with an inkjet printer, the ink on the Japanese paper is not yet completely dry.
If you rush to stack or touch it at this point, the ink will smudge and everything will be ruined.
It is ideal to spread out the printed Japanese paper one by one so that they do not overlap, and let them air dry slowly for half a day to a day.
Especially for color printing that uses a lot of ink, make sure to allow sufficient drying time.
This little extra step is the secret to maintaining a beautiful finish.
Points to improve appearance for business use
If you use Japanese paper prints for business, trust is important.
Check for typos and omissions by reading it aloud many times.
Also, if your budget allows, laminating the printed menu or putting it in a clear file will increase its durability and give it a more luxurious feel.
When sending invitations, choosing an envelope made of Japanese paper material will unify the impression upon receipt and convey your commitment even more.
We also carry Japanese paper envelopes at our store, so please take a look.
→ Click here for Japanese paper envelopes
Finishing techniques that stand out at art sales and exhibitions
If you’re going to sell or exhibit your own work printed on Japanese paper, let’s add a little something extra to the presentation.
By tearing the edges of the print by hand without using a ruler to create a “deckle edge,” each piece becomes an art piece with a different expression.
Also, simply putting the finished print in a frame that matches the atmosphere of the work will greatly increase its value.
Don’t forget to put your signature and edition number on the back of the print.
Beginner’s Guide to Buying Japanese Paper
Now, let’s finally get some Japanese paper. But you may be wondering where to buy what.
Here, we’ll provide points to avoid failure on your first purchase and tips for smart shopping.
Here, we will guide you through the points to avoid failure in your first purchase and hints for smart shopping.
Conditions for a “fail-proof” Japanese paper set for your first step
If you’re trying Japanese paper printing for the first time, choosing Japanese paper that meets the conditions of “A4 size,” “thickness around 0.15mm,” and “compatible with both pigment and dye inks” is the least likely to fail.
In addition to this, we recommend starting with an “assortment pack” or “trial set” that includes several types of Japanese paper.
The surest way to success is to first get a feel for printing with these standard Japanese papers and then, once you’re used to it, try various other types.
How to buy and use A4, postcard, and square sizes separately
- A4: The most basic size. It is recommended to practice with A4 first and master the print settings. It has a wide range of uses, such as for invitations, menus, and placemats.
- Postcard: Ideal for postcards and thank-you notes. Choosing Japanese paper that supports borderless printing will expand the range of your designs.
- Square: Perfect for printing Instagram photos and the like. When arranged for display, they create a rhythmic and stylish impression.
We carry Japanese paper in various sizes at our store, so you can choose according to what you want to make.
Precautions when choosing printer-compatible Japanese paper online
Online shopping is convenient with a wide selection of products, but it has the disadvantage of not being able to see the actual product.
When purchasing, be sure to read the product description thoroughly and check for notations such as “inkjet compatible.”
Also, be sure to check the values for “basis weight (g/m²)” and “mm” that indicate the thickness of the paper.
Even with the same expression of “heavyweight,” the standard differs depending on the manufacturer.
If there are reviews that mention the model name of the printer being used, they will be very helpful.
A way of thinking about cost performance comparison so as not to choose based on price alone
Cheap Japanese paper is attractive, but it is dangerous to choose based on price alone.
Some inexpensive products have a lot of paper dust or uneven thickness, which can cause printer trouble.
Considering the number of sheets that will be wasted due to failure and, in the worst case, the cost of printer repair, it is more cost-effective in the long run to choose a manufacturer’s product with stable quality, even if it is a little expensive. To avoid “penny wise, pound foolish,” choose a reliable product.
Advantages of purchasing for practice and for the real thing separately
Especially when creating printed materials that absolutely cannot fail, such as wedding invitations, we recommend preparing “practice” and “final” Japanese paper separately.
For practice, choose a more inexpensive Japanese paper that is similar in thickness and texture to the final paper.
First, perfect the final adjustments of the layout and colors with the practice paper, and once you are confident, print on the final paper.
By following this procedure, you can minimize waste of expensive final paper and also reduce mental pressure.
The importance of deciding on one “go-to washi” that is easy to repurchase
After trying various types of Japanese paper, finding one “go-to washi” that is easiest for you to use and that you like the finish of will make your future creative activities very smooth.
If you print with that printer and those settings, you will always get the same beautiful finish.
If you have such a “favorite piece,” you can respond without panicking even when you suddenly need a thank-you note or an invitation for an urgent purpose.
First, try to find the best partner that is compatible with your printer.
Conclusion: To Maximize Satisfaction
Finally, let’s summarize the content so far.
The satisfaction of printing on Japanese paper varies greatly depending on the choice of Japanese paper, the printer environment, and a little bit of knowledge.
Please bookmark this article so you can refer to it anytime you’re in trouble.
Final Checklist to Avoid Failure
- □ Have you chosen printer-compatible Japanese paper?
- □ Is the ink type (inkjet/laser) correct?
- □ Have you changed the paper setting to “heavyweight paper” or “postcard”?
- □ Have you chosen “rear feed” or “manual feed” for the paper feed method?
- □ Is the Japanese paper warped or damp?
- □ Did you do a test print of one sheet first?
- □ Is the printing side (front/back) correct?
If you clear this list, your success rate of printing on Japanese paper will increase dramatically.
“Printer Environment” and “Japanese Paper Lineup” to Review by Purpose
If you’re thinking of seriously enjoying Japanese paper printing from now on, it might be a good opportunity to review your own environment.
If your current printer only has front feeding, simply considering a model that supports rear feeding will dramatically increase the types of Japanese paper you can use.
Also, if you want to make text look sharp, a model with pigment ink is advantageous.
By focusing on what you “want to create” and preparing the optimal printer environment and a lineup of Japanese paper to match, the possibilities for creation will expand infinitely.
Optimal balance of Japanese paper, ink, and settings calculated backward from the ideal finish
The trick to mastering Japanese paper printing is to think backward from the final “ideal finish.”
If you want to write a warm letter, choose a texture-oriented Japanese paper and set the ink amount to be restrained.
If you want to display a vivid work, choose a color-oriented Japanese paper and adjust the image data to be slightly brighter accordingly.
In this way, by clarifying the goal, the optimal balance of the Japanese paper to choose, the ink, and the printer settings will naturally become apparent.
A small step you can take today
After reading this article, you may have become interested in trying to print on Japanese paper.
First, don’t think too hard, and let’s take a small step that you can do today.
The first step is to purchase a trial pack containing several sheets of A4 size inkjet compatible Japanese paper.
Then, try printing your favorite words or simple illustrations while looking at the checklist in this article.
That one sheet should be the memorable first step in giving shape to your desire to “express.”
Three criteria to return to when you are lost
- Safety: Will it break the printer? (Is it compatible Japanese paper, is the thickness appropriate?)
- Purpose: For what purpose, to whom do you want to deliver it? (Is the texture, color, and size appropriate?)
- Reproducibility: Can you make it the same way again? (Can you purchase it stably, have you recorded the settings?)
With this axis, you should always be able to make the optimal choice calmly.
How to nurture your “favorite Japanese paper” that leads to repeat purchases
Once you’ve found your favorite “go-to washi,” let’s “nurture” it.
Try printing various things on that Japanese paper and give them as gifts to friends and family. They will surely compliment you, saying, “What a lovely paper.”
Feedback from others can be a hint for new creations.
By accumulating such successful experiences, your attachment to that Japanese paper will deepen further.
Your very own “favorite Japanese paper” will surely enrich your daily life.
If you are unsure about which Japanese paper to choose, please take a look at our extensive lineup. Our expert staff will be happy to assist you, so please feel free to ask.


Comments