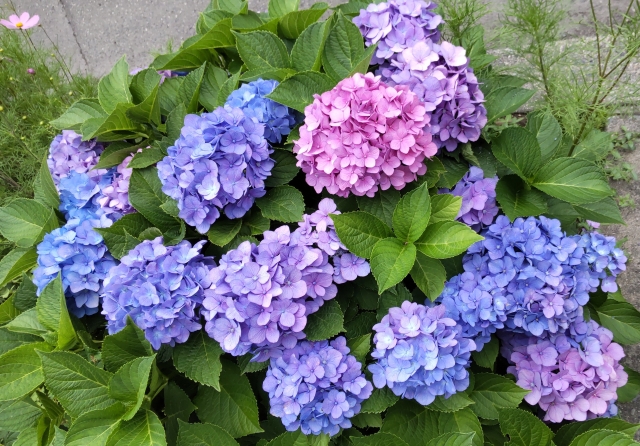
In the beautiful hydrangea season, why not decorate your room with washi torn paper art?
This article provides a comprehensive explanation of how to make hydrangea torn paper art with washi, recommended kits, and ways to enjoy your creations, suitable for beginners, families with children, and elderly care facilities.
Please experience the warmth of washi and the charm of handmade crafts.
How to Make Hydrangea Torn Paper Art with Washi
Hydrangea torn paper art with washi is a craft that allows you to enjoy the soft colors unique to washi and the three-dimensional feel of torn paper art.
The process is simple, making it appealing for even beginners to start easily.
Here, we’ll introduce specific instructions from basic methods to tips for beginners to avoid failure, plus arrangement methods that can be enjoyed by children and elderly people.
Basic Steps for Hydrangea Torn Paper Art with Washi
The process for creating hydrangea torn paper art with washi is as follows:
- Creating the sketch
- Making parts
- Pasting
- Adjustment
Hydrangea torn paper art with washi creates three-dimensional and colorful hydrangeas by drawing a sketch and tearing and layering washi pieces.
First, draw the outline of hydrangeas and leaf shapes with a pencil on the base paper.
Next, tear the washi with your fingertips to create petal and leaf parts.
Paste the torn washi along the sketch with glue, layering while considering the overall balance.
Finally, adjust the details to complete.
Although the work is simple, individuality comes out through the colors and tearing methods of washi, allowing even beginners to create original works.
How to Draw Sketches and Arrangement Tips
For sketches, draw multiple simple circles or ovals to represent hydrangea flower clusters.
Draw leaves larger and be conscious of balance with the flowers.
For arrangement, center the flower clusters and place leaves and stems diagonally to create movement and a natural impression.
If sketching is difficult, we recommend searching the internet for “hydrangea coloring page” and using free materials.
Draw sketches lightly and use them as guides when pasting washi.
Points for Tearing and Pasting Washi
Tear washi gently with your fingertips to create natural softness at the edges.
Good balance is achieved by making petals smaller and leaves slightly larger.
When pasting, apply glue thinly and paste with slight overlaps to create three-dimensional effects.
Color gradations and depth can be expressed through the overlapping of washi, so try combining different colored washi.
For pasting order, work from back to front for a clean finish.
Tips for Beginners to Avoid Failure
Many people are trying torn paper art for the first time, but by mastering a few points, anyone can create wonderful works. Here, we’ll specifically explain points that beginners often struggle with, such as color selection, gradient techniques, and techniques for creating three-dimensional effects.
Color Selection and Gradient Techniques
Hydrangeas are attractive for their diverse colors including blue, purple, pink, and white. Prepare several colors of washi specifically for torn paper art, origami, or washi origami.
Changing colors for each petal or creating gradations with different shades of the same color results in more realistic and beautiful finishes.
For example, using 3-4 shades of blue washi and changing colors from center to outside can express natural gradations.
If you’re unsure about color combinations, refer to actual hydrangea photos or international “hydrangea paper art” works.
Techniques for Creating Three-Dimensional Effects
To create three-dimensional effects, the key point is to paste petals and leaves with slight overlaps.
Also, rolling washi or lightly folding edges before pasting creates a soft three-dimensional feel.
For leaf veins, pasting thinly torn washi increases realism.
Furthermore, adding darker colored washi to shadowed areas as a finishing touch emphasizes depth.
These techniques can also be learned from “washi torn paper art” videos on YouTube, so please make use of them.
Simple Arrangements for Children and Elderly to Enjoy
A major attraction of hydrangea torn paper art with washi is that it can be enjoyed regardless of age or experience. When creating with children or elderly people, ease of work and safety are also important.
Here, we’ll introduce arrangement methods that anyone can easily tackle and ideas for group enjoyment.
For small children and elderly people, preparing larger petal and leaf parts in advance makes work easier.
Kits that can be completed just by pasting or using double-sided tape keep hands clean and are safe.
Using fewer colors for simple finishes or writing messages on the base paper to make cards is also recommended.
“Collaborative creation” where groups make one large hydrangea together is also popular in facilities and classrooms. Depending on arrangements, it can be enjoyed regardless of age or level.
Materials and Recommended Kits for Hydrangea Washi Torn Paper Art
What materials and tools are needed to start hydrangea torn paper art with washi?
Here, we’ll explain in detail the types and characteristics of washi, convenient tools, and recommended kits that are reassuring even for beginners.
Master the key points of material selection to start creating works more enjoyably and without failure.
Basic Materials for Hydrangea Torn Paper Art with Washi
Washi torn paper art requires washi with attention to color and texture, and tools that support the work.
Here, we’ll specifically introduce the types and characteristics of washi most suitable for hydrangea torn paper art, and necessary tools.
Types and Characteristics of Washi
Washi used for hydrangea torn paper art commonly includes colored washi, torn paper art-specific washi, and origami washi.
Colored washi has good color development and is characterized by soft edges when torn. Hand-made washi has a unique texture that adds luxury to works.
For beginners, thin and easy-to-handle “hosho paper” or “mingei paper” are recommended.
Internationally, washi sold as “washi paper for crafts” is also popular and can be obtained from Amazon, Etsy, and other sources.
Our store also handles colorful torn paper art washi, so please take a look.
Tools (glue, tweezers, base paper, etc.)
Basic tools are “glue” for pasting washi, “tweezers” for handling small parts, and “base paper” that serves as the foundation for works.
Glue includes glue sticks, liquid glue, and washi-specific glue.
Tweezers make detailed work easier and are especially recommended for elderly people or those who are not good with their hands.
For base paper, choose easy-to-display materials like thick drawing paper, colored paper, or boards.


Recommended Hydrangea Torn Paper Art Kits
For those who find it difficult to gather materials one by one or those trying for the first time, “torn paper art kits” that include everything needed are recommended. Here, we’ll explain how to choose beginner-friendly kits and points to check when purchasing.
How to Choose Beginner-Friendly Kits
Beginner-friendly kits are convenient as they come with necessary washi, base paper, sketches, glue, and other items as a set.
Kits that include instruction manuals or instructional videos allow first-time users to work with confidence.
Number of colors, part sizes, and working time are also check points.
On Amazon and Rakuten Market, searching for “hydrangea torn paper art kit” or “hydrangea washi kit” will reveal various domestic and international kits.
Check Points When Purchasing Kits
When choosing kits, check the quality and number of colors of washi and the completeness of accessories. Reviews and word-of-mouth are also helpful references.
Particularly, kits with many comments like “easy to understand even for beginners” or “enjoyed together with children” are reassuring.
For use in elderly facilities or classrooms, “group kits” that include sets for multiple people are also recommended.
Before purchasing, confirm that all tools necessary for creation are included.
Charm and Ways to Enjoy Hydrangea Torn Paper Art with Washi
Hydrangea torn paper art with washi has the great charm of not just creating, but enjoying various ways in daily life such as displaying, giving as gifts, and more.
Here, we’ll widely introduce why hydrangea torn paper art with washi is popular, how to use it as interior decoration or gifts, and even arrangement examples for completed works.
Reasons Why Hydrangea Torn Paper Art with Washi is Popular
Torn paper art that combines the warmth of washi with the seasonal feeling of hydrangeas is loved by a wide range of generations.
Its popularity is also due to the wide range of applications, such as displaying as interior decoration or giving as handmade gifts.
As Interior Decoration to Enjoy Seasonal Feelings
Hydrangea torn paper art with washi is popular as interior decoration that can easily incorporate the seasonal feelings of the rainy season and early summer. Simply displaying in the living room, entrance, or by windows creates a Japanese atmosphere and fresh coloring.
It has the warmth unique to handmade items and can also serve as a conversation starter with family and guests. Internationally, the culture of enjoying each season as “seasonal washi paper art” is also spreading.
Perfect for Handmade Gifts and Presents
Hydrangea torn paper art with washi is also appreciated as gifts and presents that convey the warmth of handmade items.
Giving them for Father’s Day, birthdays, or rainy season greetings according to the season adds a special feeling.
Adding messages to the base paper or giving them as cards or framed pieces creates one-of-a-kind gifts.
Internationally, popularity as “handmade washi gifts” is also increasing.
How to Display Completed Works and Arrangement Examples
Completed torn paper art can expand enjoyment even further depending on how it’s displayed and arranged. Let’s enjoy original works by incorporating various ideas such as framing, wall hanging, and card applications.
Framing, Wall Hanging, and Card Applications
Completed hydrangea torn paper art gains luxury when displayed in frames.
Even simple frames from 100-yen shops look great, and colored paper sizes fit perfectly in Japanese rooms or entrances.
Attaching wall-hanging strings or arranging into mini sizes as cards or bookmarks is also recommended.
For gifts, wrapping them adds even more special feeling.
Seasonal Arrangement Ideas
Hydrangea torn paper art with washi can be enjoyed by changing arrangements each season.
For example, during the rainy season, adding frog or umbrella motifs, or combining with morning glories or goldfish in summer is lovely.
In autumn with autumn leaves, in winter with camellias or snow crystals – you can enjoy all year round just by changing washi colors and motifs.
Searching for “seasonal washi collage” in English will also provide unique international ideas for reference.
Summary of How to Make Hydrangea Torn Paper Art with Washi
- Hydrangea torn paper art with washi can be easily enjoyed even by beginners
- Preparation is simple using necessary materials and kits
- Attention to color, arrangement, and three-dimensional effects creates authentic finishes
- Can be widely utilized as interior decoration and gifts
- Rich arrangements that can be created together with children and elderly
Hydrangea torn paper art with washi is a craft that can be easily started and allows you to enjoy seasonal feelings and the warmth of handmade items.
Using kits and materials, you can create your own unique works through attention to color and arrangement.
It’s perfect for interior decoration and presents, so please try challenging it together with family and friends.
再試行Claudeは間違えることがあります。回答内容を必ずご確認ください。 3.7 Sonnet

Comments